 如何将此ESP32 LORA模块用作发送方和接收方
步骤1:操作(数据传输)
这是装配体工作原理图。
步骤2:使用的资源
1 Arduino Nano ATmega328
1 Arduino以太网模块ENC28J60
1气体传感器模块MQ2
1湿度和温度传感器DHT22( AM2302)
2330欧姆电阻
1 4k7欧姆电阻
1蜂鸣器5V
1个绿色LED
1红色LED
跳线
步骤3:功能-发送方
1 ESP32 LORA Display
1气体传感器模块MQ2
1湿度和温度传感器DHT22(AM2302)
1个4k7欧姆电阻器
跳线
第4步:使用的功能-接收器
1个ESP32 LORA OLED显示屏
1个Arduino Nano ATmega328
1个用于Arduino的以太网模块ENC28J60
2330 ohm r电阻器
1个蜂鸣器5V
1个绿色LED
1个红色LED
跳线
步骤5:MQ-2气体传感器灵敏度
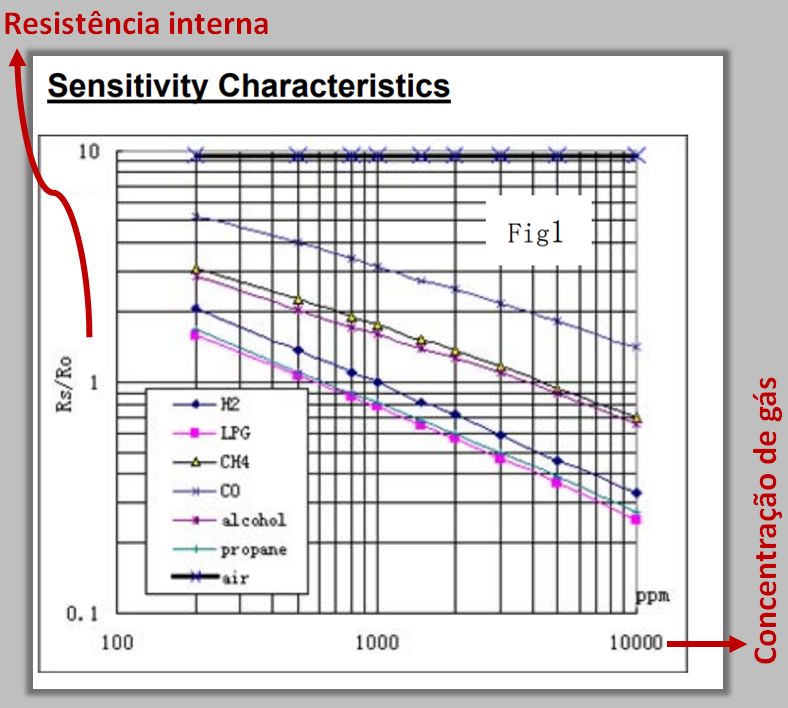
传感器的电阻(Rs/Ro)根据现有的气体浓度(ppm)更高或更低。此浓度可以通过引脚A0的输出来显示。
MQ-2气体传感器对气体具有高灵敏度:
•LPG(液化石油气);
•丙烷(C3H8);
•氢气(H2);
•甲烷(CH4);
•燃料气体,例如丙烷, CO,酒精和丁烷(用于打火机)。
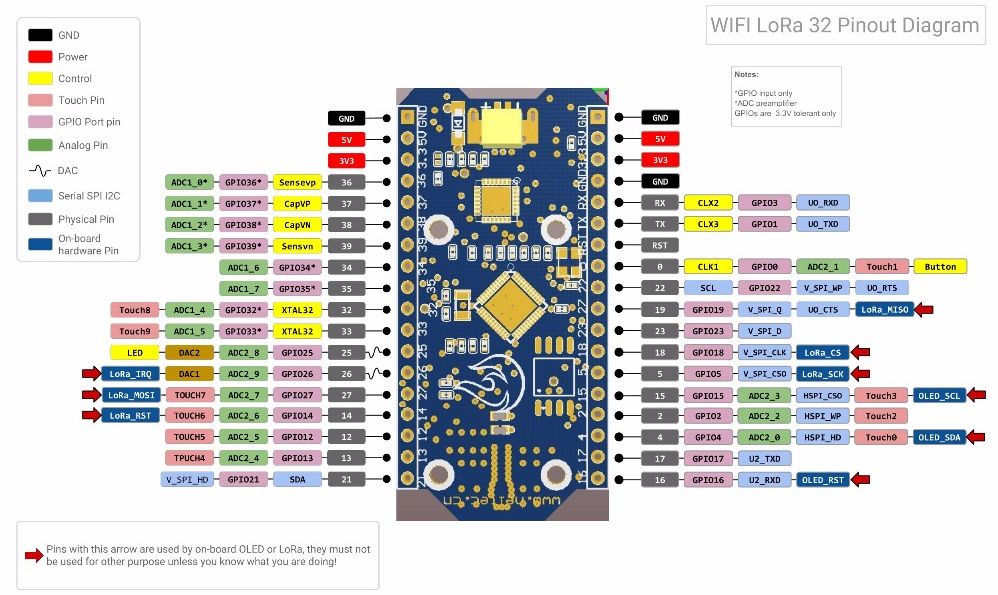
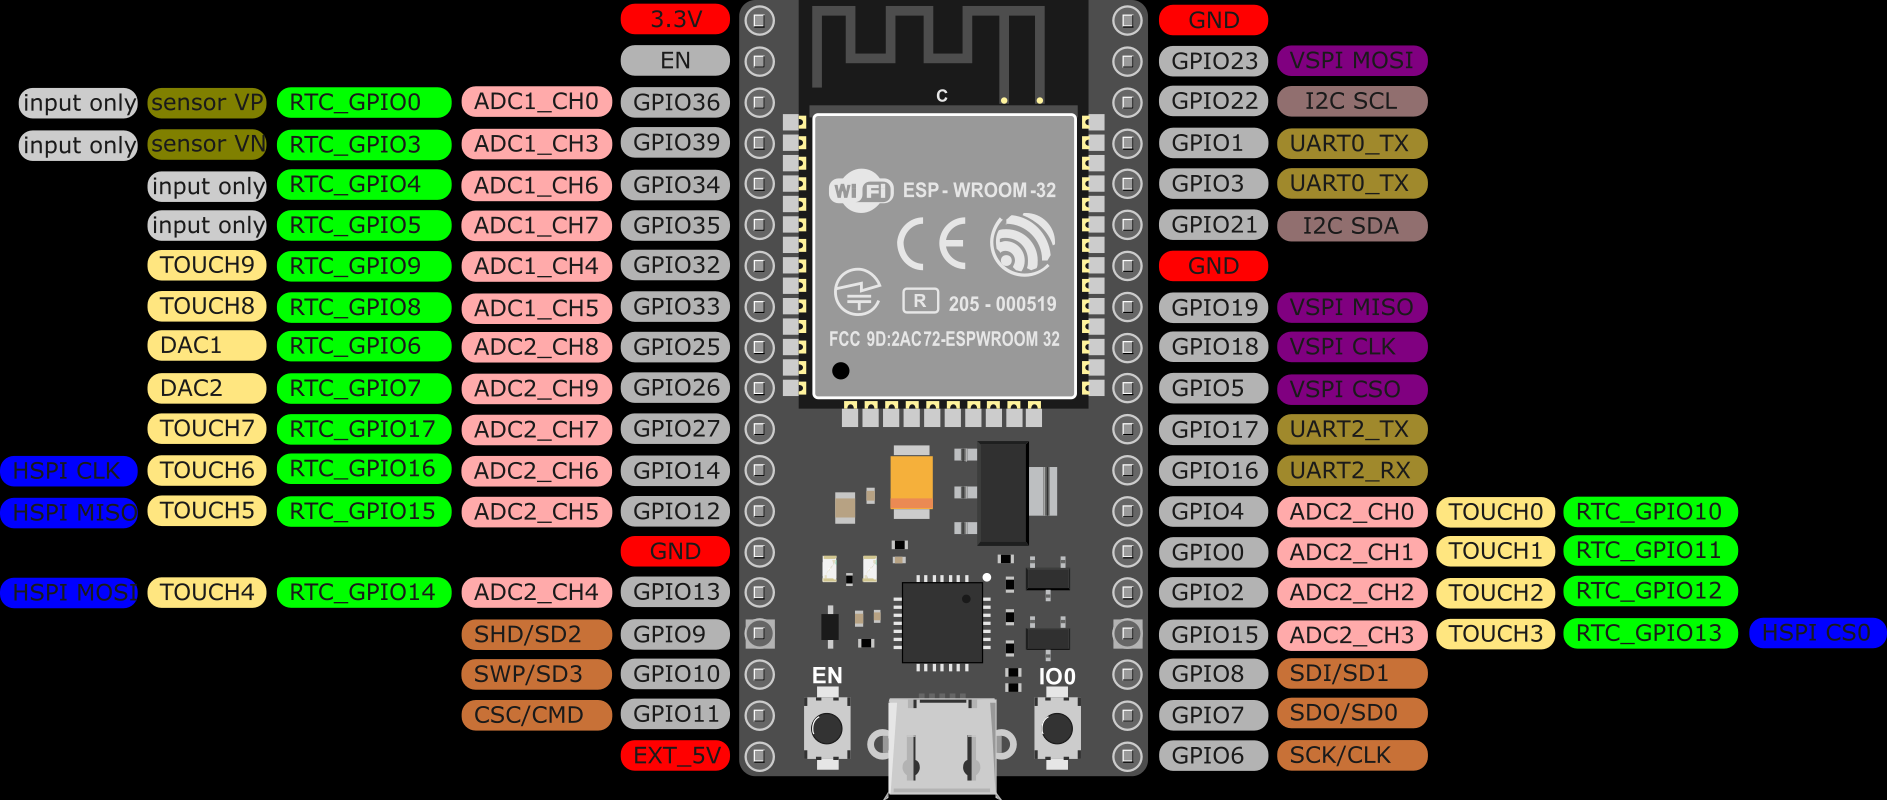
步骤6:发送器安装--- Pinout ESP32 LORA OLED
步骤7 :发送器电路

步骤8:发送器安装
步骤9:安装接收器---引脚排列Arduino Nano ATmega328

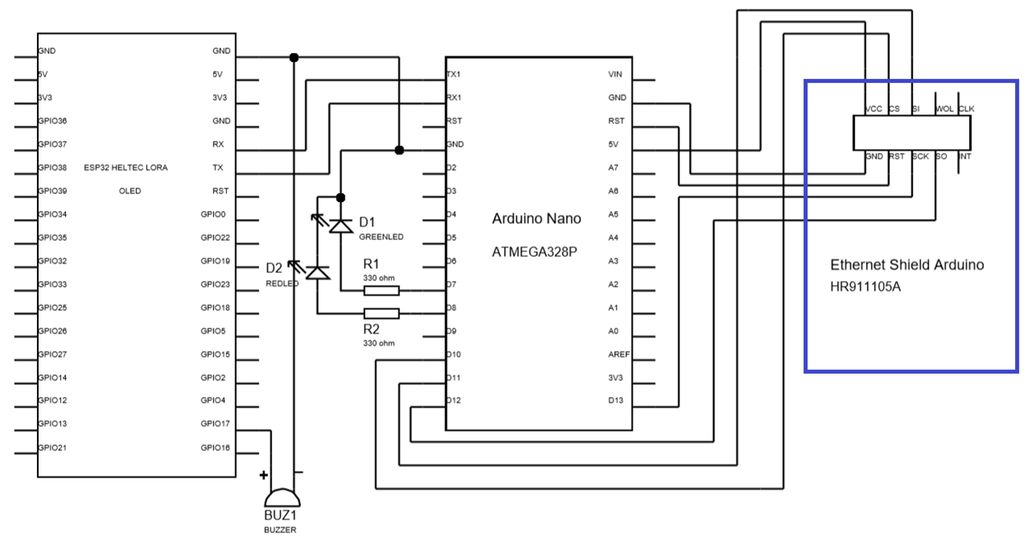
步骤10:接收器电路
步骤11:接收器安装
绿色LED指示Arduino已连接到以太网客户端。
红色LED指示已发送SMS。
发送SMS时,Arduino已断开连接,因此不再发送任何消息。
步骤12:DHT库安装
1。转到草图-》包含库-》库管理器。
2。搜索SimpleDHT,然后单击“安装”。
步骤13:发件人-代码的组织
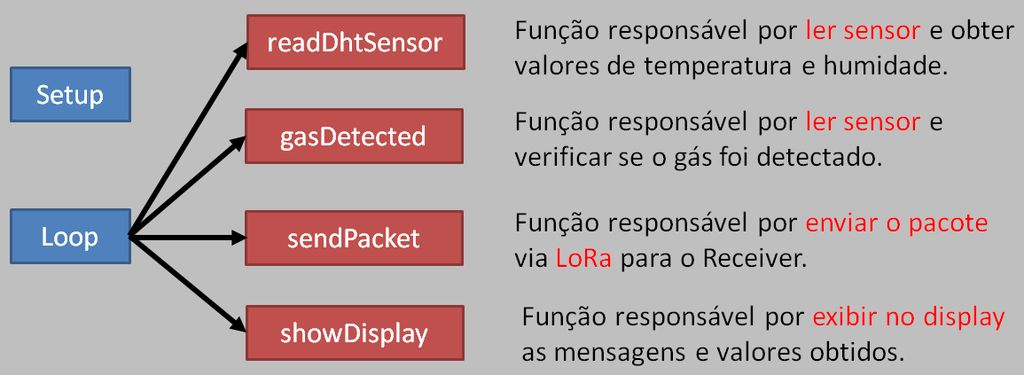
设置 》
循环
-readDhtSensor:负责读取传感器和获取温度和湿度值。
-gasDetected:负责读取传感器并验证是否已检测到气体的功能。
-sendPacket:负责通过LORA发送包裹的功能
-showDisplay:负责显示在显示屏上获得的消息和值的功能。
步骤14:发件人代码[包含和定义]
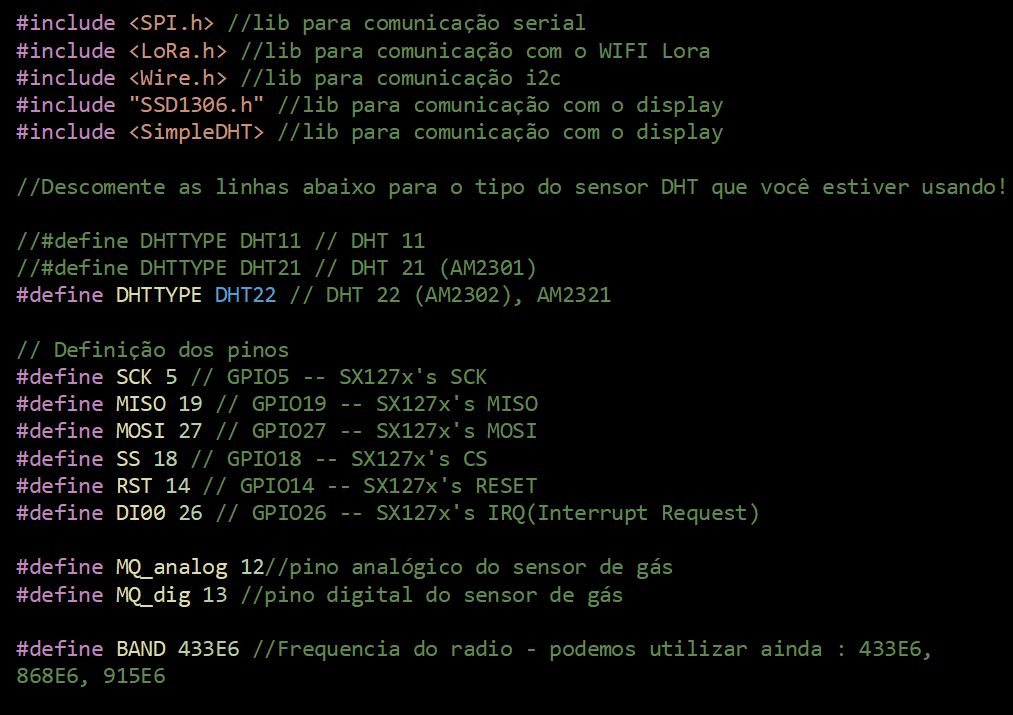

首先,我们将包含定义引脚的库。
#include //serial peripheral interface (SPI) library
#include //wifi lora library
#include //communication i2c library
#include “SSD1306.h” //display communication library
#include //dht communication library
//Descomment the line below which dht sensor type are you using
//#define DHTTYPE DHT11 // DHT 11
//#define DHTTYPE DHT21 // DHT 21 (AM2301)
#define DHTTYPE DHT22 // DHT 22 (AM2302), AM2321
我们将处理
// DHT Sensor
const int DHTPin = 23;
int analog_value; //variable used to receive the analog signal from sensor (from 100 to 10000)
int dig_value; //variable used to receive the digital signal from sensor
int gas_limit = 0; //used to indicates the minimum value to active the gas sensor (that value changes as the sensor screw is adjusted)
//h = humidity; c = Celsius temperature
float h, c;
String packSize; //variable used to receive the size of package converted in string
String packet = “OK”; //part of packet, that informs the status of sensor. That variable will be concatenate with the string “values”
String values = “|-|-”; //humidity and temperature values, separated by pipe
//parameters: address,SDA,SCL
SSD1306 display(0x3c, 4, 15); //display object
SimpleDHT22 dht22;
// Pins definition
#define SCK 5 // GPIO5 -- SX127x‘s SCK
#define MISO 19 // GPIO19 -- SX127x’s MISO
#define MOSI 27 // GPIO27 -- SX127x‘s MOSI
#define SS 18 // GPIO18 -- SX127x’s CS
#define RST 14 // GPIO14 -- SX127x‘s RESET
#define DI00 26 // GPIO26 -- SX127x’s IRQ(Interrupt Request)
#define MQ_analog 12 //analog gas sensor pin
#define MQ_dig 13 //digital gas sensor pin
#define BAND 433E6 //Radio frequency, we can still use: 433E6, 868E6, 915E6
步骤15:发送方除了定义气体传感器的最小触发值外,还带有用于接收模拟和数字信号的变量的传感器。代码[设置]

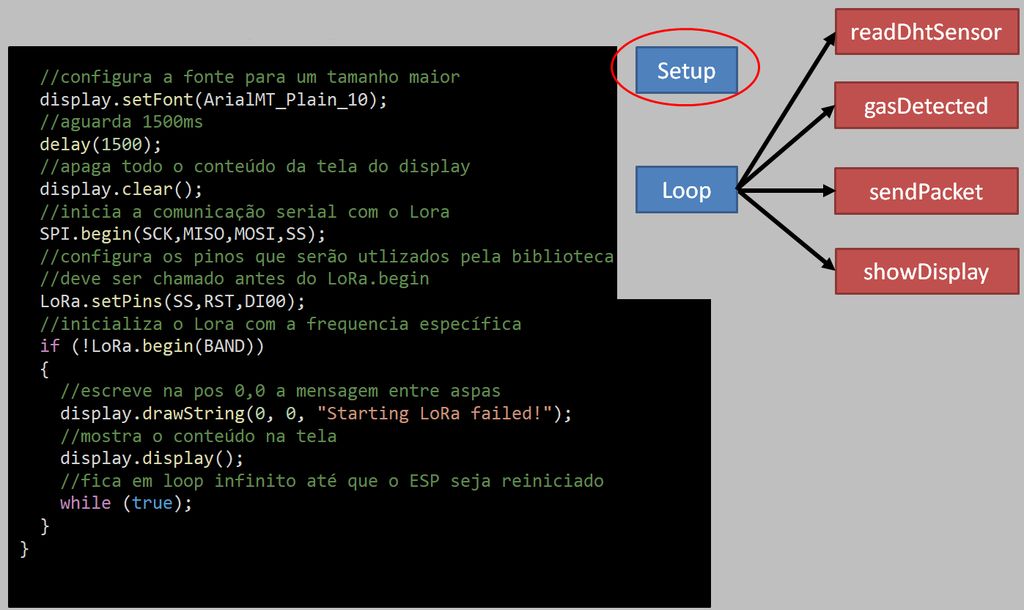
在设置中,我们将首先配置引脚和显示。
void setup()
{
//set the humidity and temperature values with zero
h = c = 0;
//initialize the Serial with 9600b per second
Serial.begin(9600);
//configures analog pin as input
pinMode(MQ_analog, INPUT);
//configures digital pin as input
pinMode(MQ_dig, INPUT);
//configures oled pins as output
pinMode(16,OUTPUT);
//reset oled
digitalWrite(16, LOW);
//wait 50ms
delay(50);
//while the oled is on, GPIO16 must be HIGH
digitalWrite(16, HIGH);
//initializes the display
display.init();
//flip vertically the display
display.flipScreenVertically();
接下来,我们将在显示屏上定义打印特性,并开始与LORA进行串行通信。然后,我们将继续进行配置。
//set display font
display.setFont(ArialMT_Plain_10);
//wait 1500ms
delay(1500);
//clear the display
display.clear();
//initializes serial interface
SPI.begin(SCK,MISO,MOSI,SS);
//set Lora pins
LoRa.setPins(SS,RST,DI00);
//initializes the lora, seting the radio frequency
if (!LoRa.begin(BAND))
{
//draw in the position 0,0 the message in between quotation marks
display.drawString(0, 0, “Starting LoRa failed!”);
//turns on the LCD display
display.display();
//do nothing forever
while (true);
}
}
步骤16:发件人代码[循环]

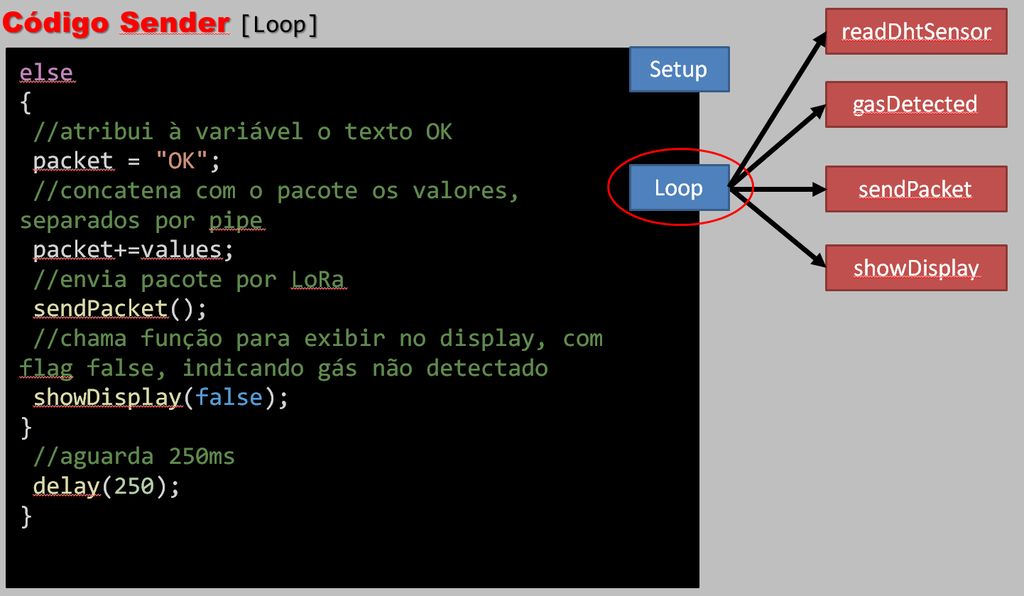
在循环中,我们还使用显示器的特性,并指示读取传感器的步骤以及LORA的气体检测和警报发送的方法。
void loop()
{
//clear the display
display.clear();
//set the text alignment to left
display.setTextAlignment(TEXT_ALIGN_LEFT);
//sets the text font
display.setFont(ArialMT_Plain_16);
//draw in the position 0,0 the message in between quotation marks
display.drawString(0, 0, “Running.。.”);
//reads temperature sensor values
readDhtSensor();
//it concatenates on string the humidity and temperature values separated by pipe
values=“|”+String(h)+“|”+String(c);
//if the digital signal of sensor is lower, it means gas detected (inverse logic)
if(gasDetected())
{
//sets the value of the packet string to “ALARM”
packet = “ALARM”;
//it concatenates the packet with the values
packet+=values;
//sends package by LoRa
sendPacket();
//shows display, true = gas detected
showDisplay(true);
}
我们定义了将通过SMS发送的信息。
else
{
//sets the value of the packet string to “OK”
packet = “OK”;
//it concatenates the packet with the values
packet+=values;
//sends package by LoRa
sendPacket();
//shows display, false = no gas detected
showDisplay(false);
}
//waits 250ms
delay(250);
}
步骤17:发件人代码[showDisplay]
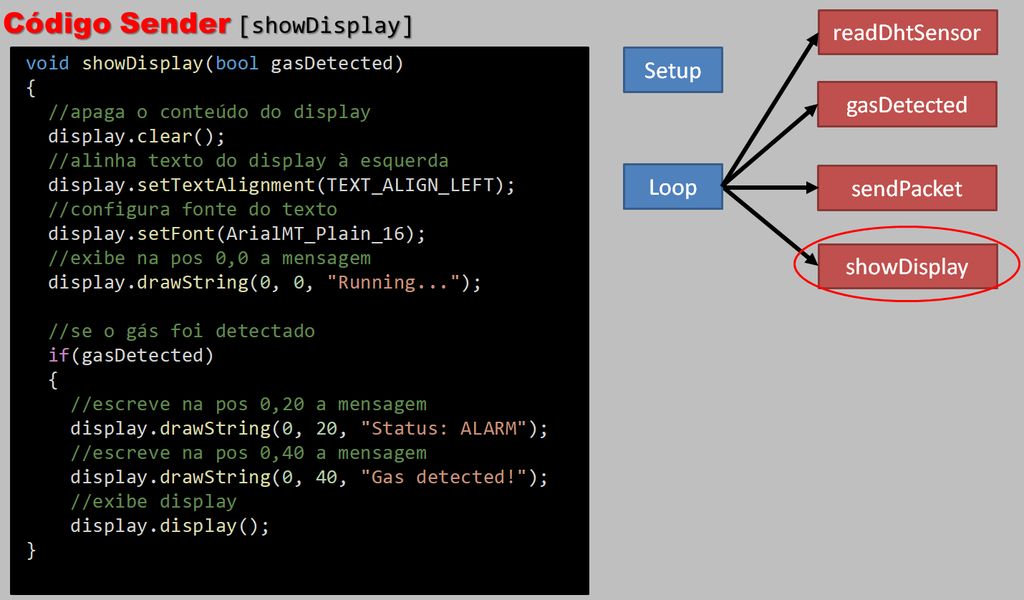
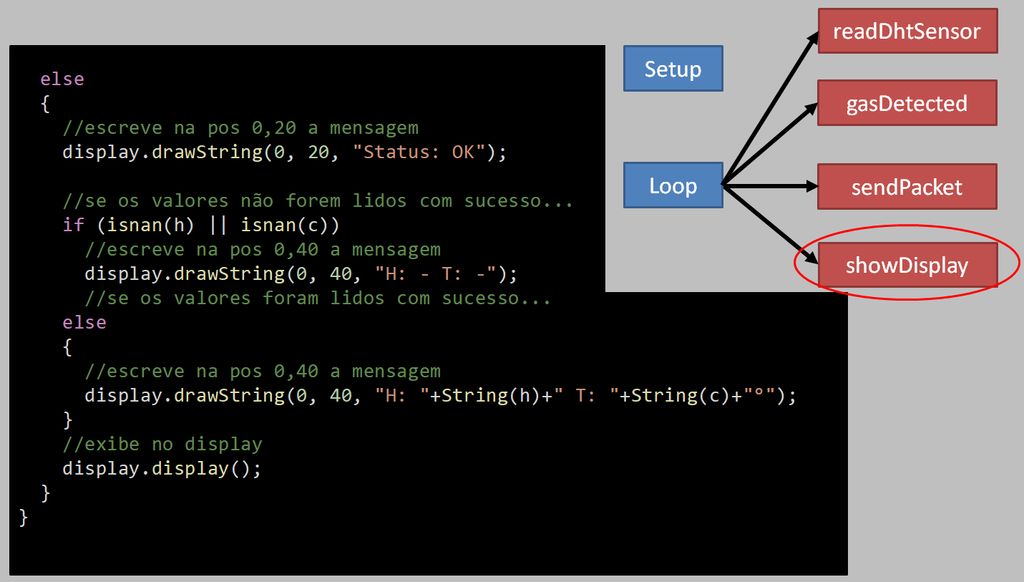
同样,我们处理LORA显示屏上的数据显示。
void showDisplay(bool gasDetected)
{
//clear the display
display.clear();
//set the text alignment to left
display.setTextAlignment(TEXT_ALIGN_LEFT);
//sets the text font
display.setFont(ArialMT_Plain_16);
//draw in the position 0,0 the message in between quotation marks
display.drawString(0, 0, “Running.。.”);
//if flag = true
if(gasDetected)
{
//draw in the position 0,20 the message in between quotation marks
display.drawString(0, 20, “Status: ALARM”);
//draw in the position 0,40 the message in between quotation marks
display.drawString(0, 40, “Gas detected!”);
//turns on the LCD display
display.display();
}
else
{
//draw in the position 0,20 the message in between quotation marks
display.drawString(0, 20, “Status: OK”);
//draw in the position 0,40 the message in between quotation marks
display.drawString(0, 40, “H: ”+String(h)+“ T: ”+String(c)+“°”);
//turns on the LCD display
display.display();
}
}
步骤18:发件人代码[gasDetected]

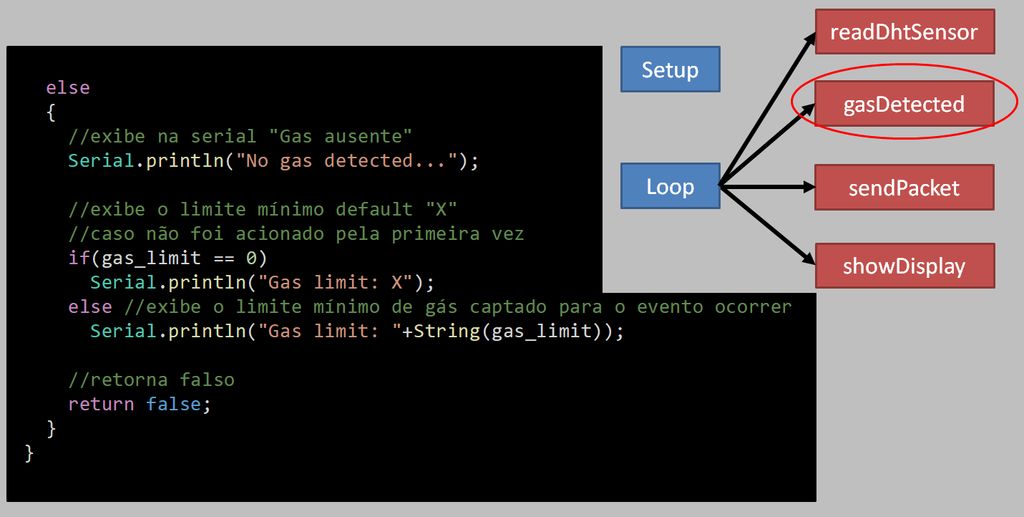
在这里,如果传感器检测到某种类型的气体泄漏,我们具有触发消息的功能。
bool gasDetected()
{
//reads the analog value of the sensor
analog_value = analogRead(MQ_analog);
//reads the digital value of the sensor
dig_value = digitalRead(MQ_dig);
//obs: the serial views in this code do not influence the operation of the prototype
//shows value to the serial
Serial.print(analog_value);
//shows tab “||” to the serial
Serial.print(“ || ”);
//inverse logic
if(dig_value == 0)
{
//sets the minimum analog value
if(gas_limit == 0 || gas_limit 》 analog_value)
gas_limit = analog_value;
//shows ‘gas detected’ to the serial
Serial.println(“GAS DETECTED !!!”);
//shows the minimum gas limit to the serial
Serial.println(“Gas limit: ”+String(gas_limit));
//gas detected
return true;
}
else
{
//shows ‘no gas detected’ to the serial
Serial.println(“No gas detected.。.”);
//if first time, shows ‘X’ to the serial
if(gas_limit == 0)
Serial.println(“Gas limit: X”);
else //shows gas limit to the serial
Serial.println(“Gas limit: ”+String(gas_limit));
//no gas detected
return false;
}
}
第19步:发送方代码[readDhtSensor]
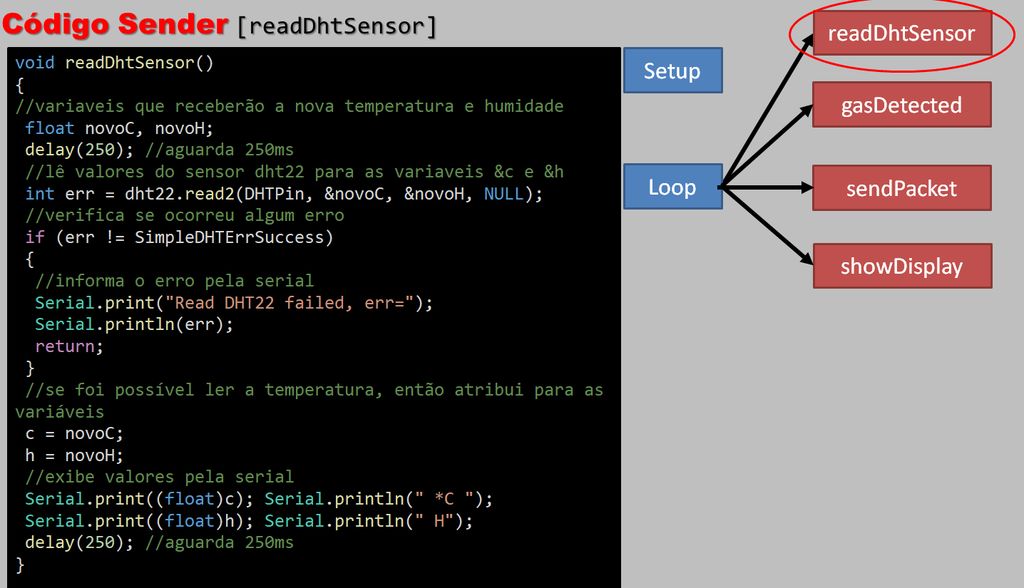
void readDhtSensor()
{
// declaration of variables that will receive the new temperature and humidity
float novoC, novoH;
//waits 250ms
delay(250);
//set dht22 sensor values tovariables &novoC and &novoH
int err = dht22.read2(DHTPin, &novoC, &novoH, NULL);
//checks for an error
if (err != SimpleDHTErrSuccess)
{
//shows error in the serial
Serial.print(“Read DHT22 failed, err=”);
Serial.println(err);
return;
}
//if no error
//sets the variable values
c = novoC;
h = novoH;
//shows values in the serial
Serial.print((float)c); Serial.println(“ *C ”);
Serial.print((float)h); Serial.println(“ H”);
//waits 250ms
delay(250);
}
第20步:发送方代码[sendPacket]

最后,我们打开了一个程序包,以添加用于SMS发送的数据。
void sendPacket()
{
//starts a connection to write UDP data
LoRa.beginPacket();
//send packet
LoRa.print(packet);
//returns an int: 1 if the packet was sent successfully, 0 if there was an error
LoRa.endPacket();
}
责任编辑:wv
-
传感器
+关注
关注
2522文章
47984浏览量
739678 -
蜂鸣器
+关注
关注
12文章
849浏览量
45282 -
ESP32
+关注
关注
13文章
895浏览量
15795
发布评论请先 登录
相关推荐
esp32s3使用多串口
启明云端将推出基于ESP32-C6的Wi-Fi/BLE+ LoRa®低成本单通道网关方案

如何在ESP32中使用PWM
如何使用M5StickC ESP32模块通过按钮更改LED亮度

![[<b class='flag-5'>esp32</b>教程] 5、UART使用](https://file1.elecfans.com/web2/M00/89/8A/wKgZomSHL9WAMOvpAADoQjNqhTg036.png)
![[<b class='flag-5'>esp32</b>教程] 4、LEDC使用](https://file1.elecfans.com/web2/M00/88/C2/wKgaomRwrEGAdyEQAAAvfpAfL6k315.png)
![[<b class='flag-5'>esp32</b>教程]2、按键中断](https://file1.elecfans.com/web2/M00/82/75/wKgaomRTtwiAdatUAAAuERpZh60777.png)
![[<b class='flag-5'>esp32</b>教程]1、点灯之术](https://file1.elecfans.com/web2/M00/82/67/wKgaomRNHPiAZRZcAAAXIfrDybI889.png)


 工商网监
工商网监
评论