 如何使用Arduino控制GoPro
第1步:材料
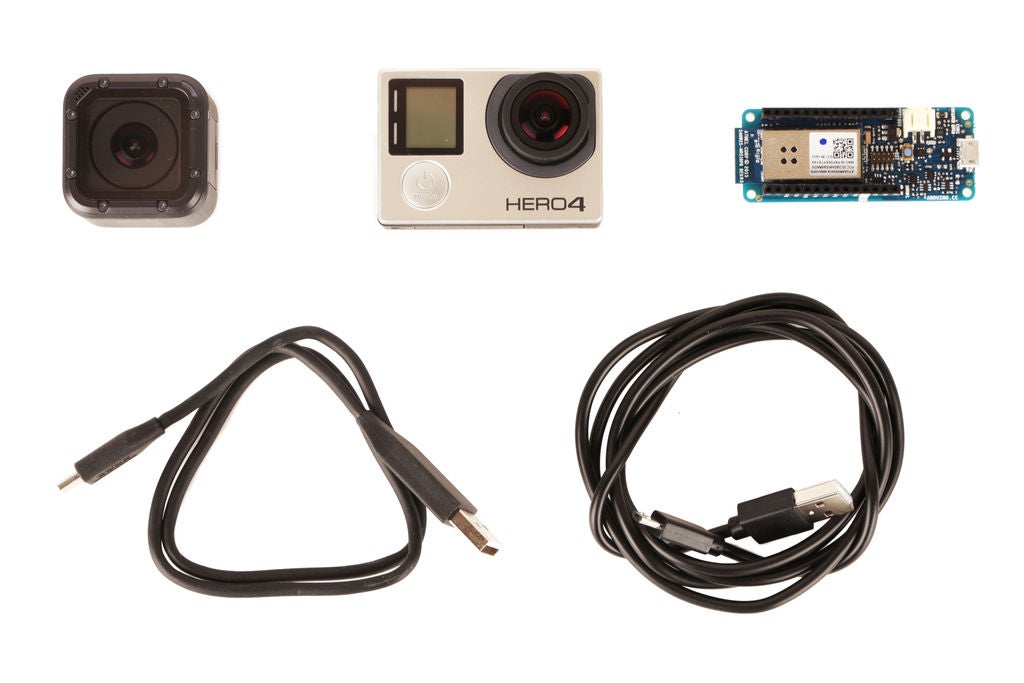
对于这个项目,你只需要做几件事。
首先,你显然需要一台GoPro相机。这些说明适用于最新型号(GoPro Hero 6)。虽然,我只是用GoPro Hero 4和GoPro Hero Session 5进行了个人测试.Hero Session模型与其他模型的控制略有不同,但我们将在稍后介绍。
您还需要Arduino MKR1000或Arduino MKR Zero。在这些说明中,我使用MKR1000。您可以使用另一个兼容Arduino的无线微控制器板(例如Feather),但我没有亲自尝试过。
您还需要一根用于Arduino的USB线,一台运行Arduino开发软件的计算机(我假设您有),以及安装了GoPro应用程序的智能手机。
如果你没有这样的东西,或者之前从未使用过Arduino,我强烈建议你在开始这个项目之前先阅读Arduino类!
步骤2:配置相机的Wifi

您需要做的第一件事就是打开并配置相机的wifi连接。我不打算深入研究这个问题,因为已经有很多教程可以做到这一点。
在GoPro Hero4上,最简单的方法就是将相机连接到按照应用中的说明操作您的手机。
一旦手机与相机配对,请使用应用程序打开相机的设置,并为wifi网络提供您选择的新名称和密码。
在GoPro上英雄会话5,同样的方法也适用。首先,按照应用中的说明将相机连接到手机。这将自动配置wifi网络的名称和密码。
要在相机上查看wifi网络名称,请导航至《 Camera Info “,该名称位于“连接设置”菜单。
步骤3:查找GoPro的MAC地址
启用wifi后,您需要确定相机的MAC(媒体访问控制)地址。在处理传统的Hero系列GoPros时,这个地址是一个很好的信息。但是,如果您使用的是GoPro Hero Session,则此地址是必须的。
为了获得它,首先使用上一步中的网络名称和密码将计算机连接到相机的wifi网络。
一旦登录到您的相机的wifi网络,打开计算机上的任何旧网页浏览器,并访问以下网址:
http://10.5.5.9/gp/gpControl/info
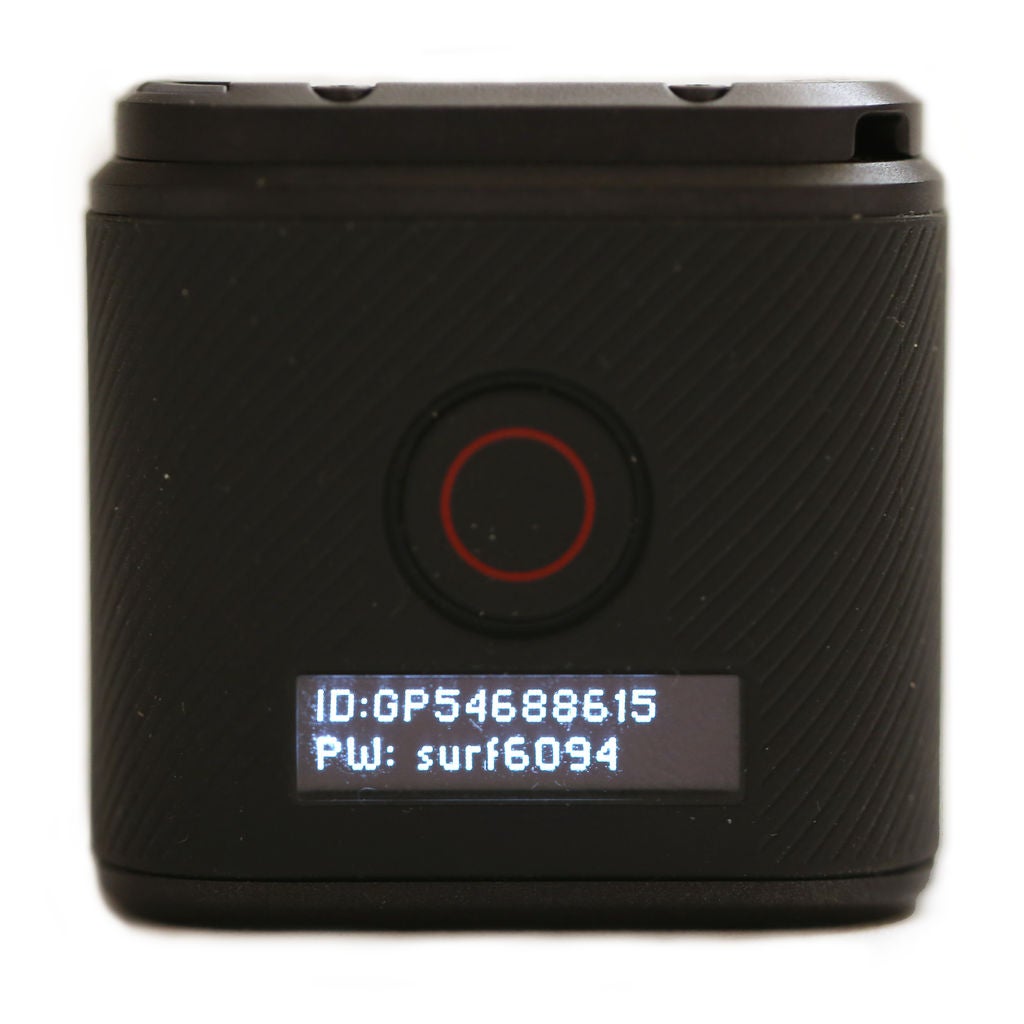
此网址应打印一个字符串您的网络浏览器中的信息类似于:
{“model_number”21,“model_name”:“HERO5Session”,“firmware_version”:“HD5.03.02.51.00”,“serial_number”:“C3212365684485 ”, “board_type”: “0×05”, “ap_mac”: “0641631510c4”, “ap_ssid”: “GP54688615”, “ap_has_default_credentials”: “0”, “能力”: “16”}
如果没有,请确保您的相机已打开,并且仍然连接到wifi。
我们感兴趣的字符串中的位是字符串“ap_mac:”之后的数字。 这个12位数字和数字字符串是MAC地址。在我的情况下,这是 0641631510c4 。
一旦确定了地址,每两个字符将其分开,并按如下格式进行格式化:
0x06,0x41,0x63,0x15,0x10,0xC4
步骤4:将Arduino连接到GoPro Hero

为了让Arduino与GoPro Hero系列相机通信,它需要使用PIN配对。要获取引脚,请在手机菜单中导航以将相机与应用配对。这应该在所有后期型号相机上生成4位数的PIN(Hero 3及更早版本的PIN有6位数)。
针脚仅持续3分钟,所以时间至关重要。
您需要手动将PIN两个次插入两者 它所说的地方:
//!!!!!!!!!!!!!!!!!!!!!!!!!!!!!!!!!!! !!!!!!!!!!!!!!!!!!!!!!!!!!!!!!!!!!!!!!!!!!!!!!
//在这里输入你的PINX XXXX在哪里了//!!!!!!!!!!!!!!!!!!!!!!!!!!!!!!!!!! !!!!!!!!!!!!!!!!!!!!!!!!!!!!!!!!!!!!!!!!!!!!!!!!
一旦输入了引脚,你只需不到三分钟就可以将它上传到Arduino并与相机建立连接。
说到哪个,别忘了输入GoPro的wifi凭据,其中包含:
//!!!!!!!!!!!!!!!!!!!!!!!!!! !!!!!!!!!!!!!!!!!!!!!!!!!!!!!!!!!!!!!!!!!!!!!!!!!! !!!!!!!!!
//输入你的WIFI名字,密码在这里
//!!!!!!!!!!!!!!!!!!!!!! !!!!!!!!!!!!!!!!!!!!!!!!!!!!!!!!!!!!!!!!!!!!!!!!!! !!!!!!!!!!!!!
为了所有意图和目的,一旦您成功上传了代码,就不会发生任何事情。然而,如果您从GoPro的设置菜单导航回视频屏幕,您现在应该能够发送命令(我们将在稍后介绍)。
如果在接下来的步骤中您似乎无法向相机发送命令,请返回并重复此步骤。
使用其PIN码将GoPro与Arduino配对的代码:
#include
#include
#include
int status = WL_IDLE_STATUS;
//!!!!!!!!!!!!!!!!!!!!!!!!!!!!!!!!!!!!!!
//ENTER YOUR WIFI NAME AND PASSWORD HERE
//!!!!!!!!!!!!!!!!!!!!!!!!!!!!!!!!!!!!!!
char ssid[] = “XXXXXXXXXXXX”; // your network SSID (name)
char pass[] = “XXXXXXXXXXXX”; // your network password (use for WPA, or use as key for WEP)
WiFiClient client;
const char* host = “10.5.5.9”;
const int httpPort = 80;
void setup(){
//Initialize serial and wait for port to open:
Serial.begin(115200);
// check for the presence of the wifi module:
if (WiFi.status() == WL_NO_SHIELD) {
Serial.println(“WiFi not present”);
// don‘t continue:
while (true);
}
// attempt to connect to Wifi network:
while ( status != WL_CONNECTED) {
Serial.print(“Attempting to connect to SSID: ”);
Serial.println(ssid);
// Connect to WPA/WPA2 network. Change this line if using open or WEP network:
status = WiFi.begin(ssid, pass);
// wait 8 seconds for connection:
delay(8000);
}
Serial.println(“Connected to wifi”);
printWifiStatus();
// START PIN
StartPin();
delay(10000);
// FINISH PIN
FinishPin();
}
void loop(){
//Nothing to do here!
delay(1000);
}
void StartPin(){
Serial.print(“connecting to ”);
Serial.println(host);
if (!client.connect(“10.5.5.9”, httpPort)) {
Serial.println(“connection failed”);
return;
}
//!!!!!!!!!!!!!!!!!!!!!!!!!!!!!!!!!!!!!!!
//ENTER YOUR PIN HERE WHERE IT SAYS XXXX
//!!!!!!!!!!!!!!!!!!!!!!!!!!!!!!!!!!!!!!!
String StartUrl = “/gpPair?c=start&pin=XXXX&mode=0”;
Serial.print(“Requesting URL: ”);
Serial.println(StartUrl);
client.print(String(“GET ”) + StartUrl + “ HTTP/1.1 ” +
“Host: ” + host + “ ” +
“Connection: close ”);
Serial.println(“Started”);
}
void FinishPin(){
Serial.print(“connecting to ”);
Serial.println(host);
if (!client.connect(“10.5.5.9”, httpPort)) {
Serial.println(“connection failed”);
return;
}
//!!!!!!!!!!!!!!!!!!!!!!!!!!!!!!!!!!!!!!!
//ENTER YOUR PIN HERE WHERE IT SAYS XXXX
//!!!!!!!!!!!!!!!!!!!!!!!!!!!!!!!!!!!!!!!
String StopUrl = “10.5.5.9/gpPair?c=finish&pin=XXXX&mode=0”;
Serial.print(“Requesting URL: ”);
Serial.println(StopUrl);
client.print(String(“GET ”) + StopUrl + “ HTTP/1.1 ” +
“Host: ” + host + “ ” +
“Connection: close ”);
Serial.println(“Finished”);
}
void printWifiStatus() {
// print the SSID of the network you’re attached to:
Serial.print(“SSID: ”);
Serial.println(WiFi.SSID());
// print your WiFi shield‘s IP address:
IPAddress ip = WiFi.localIP();
Serial.print(“IP Address: ”);
Serial.println(ip);
// print the received signal strength:
long rssi = WiFi.RSSI();
Serial.print(“signal strength (RSSI):”);
Serial.print(rssi);
Serial.println(“ dBm”);
}
步骤5:将Arduino连接到GoPro Hero会话

GoPro会话没有要响应的PIN。然而,它有它自己的特点,使连接它真的很烦人。正如您可能已经注意到的那样,只要您完成录制,或者就此而言,只要您使用相机完成大部分操作,它就会关闭并进入睡眠模式。
在您发送GoPro Hero任何类型的命令之前,您需要将其唤醒。最简单的方法是手动按下摄像机背面的菜单按钮,并在几秒钟的窗口中发出命令。然而,这很烦人,并且在任何方面都不是特别实用。
唤醒GoPro的更好方法是使用WOL数据包或“魔术数据包”。这个首字母缩写词代表Wake-on-Lan,是远程唤醒计算机从睡眠模式的协议。它需要使用UDP协议从Arduino发送字节到GoPro以唤醒它。这有点烦人,因为它与您发送所有其他控制命令的协议不同。如果你不熟悉编程,代码也不那么漂亮,处理起来会有点复杂。
然而,当它工作时,它真的像魔术一样工作。通过向Arduino发送命令,看到我的相机醒来后,我从未停止惊讶。
WOL命令(代码中的 CameraInitiate()功能)需要在大多数其他命令之前发送,并且通常应该延迟1-2秒。基本上,您需要在需要唤醒相机时(大多数时间)发送它。发送命令后,您需要暂停片刻才能让相机实际唤醒。
在下面的示例中,在设置中调用WOL功能,因此它只会唤醒第一次运行时使用相机。
不要忘记在提示的代码中输入GoPro的wifi凭据和MAC地址!
以下是唤醒相机的代码:
#include
#include
#include
int status = WL_IDLE_STATUS;
//!!!!!!!!!!!!!!!!!!!!!!!!!!!!!!!!!!!!!!
//ENTER YOUR WIFI NAME AND PASSWORD HERE
//!!!!!!!!!!!!!!!!!!!!!!!!!!!!!!!!!!!!!!
char ssid[] = “XXXXXXXXXXXX”; // your network SSID (name)
char pass[] = “XXXXXXXXXXXX”; // your network password (use for WPA, or use as key for WEP)
int localPort = 7;
byte broadCastIp[] = { 10,5,5,9 };
//!!!!!!!!!!!!!!!!!!!!!!!!!!!
//ENTER YOUR MAC ADDRESS HERE
//!!!!!!!!!!!!!!!!!!!!!!!!!!!
byte remote_MAC_ADD[] = { 0x00, 0x00, 0x00, 0x00, 0x00, 0x00 };
int wolPort = 9;
WiFiUDP Udp;
WiFiClient client;
const char* host = “10.5.5.9”;
const int httpPort = 80;
void setup(){
//Initialize serial and wait for port to open:
Serial.begin(115200);
// check for the presence of the wifi module:
if (WiFi.status() == WL_NO_SHIELD) {
Serial.println(“WiFi not present”);
// don’t continue:
while (true);
}
// attempt to connect to Wifi network:
while ( status != WL_CONNECTED) {
Serial.print(“Attempting to connect to SSID: ”);
Serial.println(ssid);
// Connect to WPA/WPA2 network. Change this line if using open or WEP network:
status = WiFi.begin(ssid, pass);
// wait 8 seconds for connection:
delay(8000);
}
Serial.println(“Connected to wifi”);
printWifiStatus();
delay(1000);
// WAKE UP YOUR SLEEPY CAMERA!
CameraInitiate(){
// NOTE: If this does not seem to be working,
// turn your camera on and off and try again.
}
void loop(){
//Nothing to do here!
delay(1000);
}
// FUNCTION TO WAKE UP THE CAMERA
void CameraInitiate(){
//Begin UDP communication
Udp.begin(localPort);
//Send the magic packet to wake up the GoPro out of sleep
delay(2000);
SendMagicPacket();
delay(5000);
// Absolutely necessary to flush port of UDP junk for Wifi client communication
Udp.flush();
delay(1000);
//Stop UDP communication
Udp.stop();
delay(1000);
}
// Function to create and send magic packet
// Taken and translated from here:
// https://www.logicaprogrammabile.it/wol-accendere-computer-arduino-wake-on-lan/
void SendMagicPacket(){
//Create a 102 byte array
byte magicPacket[102];
// Variables for cycling through the array
int Cycle = 0, CycleMacAdd = 0, IndexArray = 0;
// This for loop cycles through the array
for( Cycle = 0; Cycle 《 6; Cycle++){
// The first 6 bytes of the array are set to the value 0xFF
magicPacket[IndexArray] = 0xFF;
// Increment the array index
IndexArray++;
}
// Now we cycle through the array to add the GoPro address
for( Cycle = 0; Cycle 《 16; Cycle++ ){
//eseguo un Cycle per memorizzare i 6 byte del
//mac address
for( CycleMacAdd = 0; CycleMacAdd 《 6; CycleMacAdd++){
magicPacket[IndexArray] = remote_MAC_ADD[CycleMacAdd];
// Increment the array index
IndexArray++;
}
}
//The magic packet is now broadcast to the GoPro IP address and port
Udp.beginPacket(broadCastIp, wolPort);
Udp.write(magicPacket, sizeof magicPacket);
Udp.endPacket();
}
void printWifiStatus() {
// print the SSID of the network you‘re attached to:
Serial.print(“SSID: ”);
Serial.println(WiFi.SSID());
// print your WiFi shield’s IP address:
IPAddress ip = WiFi.localIP();
Serial.print(“IP Address: ”);
Serial.println(ip);
// print the received signal strength:
long rssi = WiFi.RSSI();
Serial.print(“signal strength (RSSI):”);
Serial.print(rssi);
Serial.println(“ dBm”);
}
步骤6:发送GoPro命令
在本例中,我将展示如何发送命令开始和停止视频录制。
也就是说,使用此处演示的相同方法,您可以为摄像机内的每个功能发送命令。 GoPro Hero 4命令似乎是所有后续型号的标准设置。但是,一些较新的相机具有新功能和特定于摄像头的命令,值得研究。您可以通过单击特定相机型号的链接在Unofficial GoPro WiFi API github页面上找到相机特定命令。
以下示例使用5秒钟录制,停止录制,等待5个以上秒,然后重新开始。如果您正在使用Hero Session,请务必取消唤醒GoPro的代码行。
再次,不要忘记输入您的GoPro的wifi凭据和MAC地址!
发送开始和停止录制命令的代码:
#include
#include
#include
int status = WL_IDLE_STATUS;
//!!!!!!!!!!!!!!!!!!!!!!!!!!!!!!!!!!!!!!
//ENTER YOUR WIFI NAME AND PASSWORD HERE
//!!!!!!!!!!!!!!!!!!!!!!!!!!!!!!!!!!!!!!
char ssid[] = “XXXXXXXXXXXX”; // your network SSID (name)
char pass[] = “XXXXXXXXXXXX”; // your network password (use for WPA, or use as key for WEP)
int localPort = 7;
byte broadCastIp[] = { 10,5,5,9 };
//!!!!!!!!!!!!!!!!!!!!!!!!!!!
//ENTER YOUR MAC ADDRESS HERE
//!!!!!!!!!!!!!!!!!!!!!!!!!!!
byte remote_MAC_ADD[] = { 0x00, 0x00, 0x00, 0x00, 0x00, 0x00 };
int wolPort = 9;
WiFiUDP Udp;
WiFiClient client;
const char* host = “10.5.5.9”;
const int httpPort = 80;
void setup(){
//Initialize serial and wait for port to open:
Serial.begin(115200);
// check for the presence of the wifi module:
if (WiFi.status() == WL_NO_SHIELD) {
Serial.println(“WiFi not present”);
// don‘t continue:
while (true);
}
// ADD THIS TO LOOP??????????????
// MAKE ITS OWN FUNCTION???????
// attempt to connect to Wifi network:
while ( status != WL_CONNECTED) {
Serial.print(“Attempting to connect to SSID: ”);
Serial.println(ssid);
// Connect to WPA/WPA2 network. Change this line if using open or WEP network:
status = WiFi.begin(ssid, pass);
// wait 8 seconds for connection:
delay(8000);
}
Serial.println(“Connected to wifi”);
printWifiStatus();
}
void loop(){
// Add code to check to see if wifi is still on. If not, stop and keep trying to connect
// WAKE UP CAMERA FROM SLEEP AND CONNECT
CameraInitiate();
// Add code to make sure that camera recognized (status 31)
// START RECORDING
StartRecording();
delay(5000);
// STOP RECORDING
StopRecording();
delay(5000);
}
void StartRecording(){
Serial.print(“connecting to ”);
Serial.println(host);
if (!client.connect(“10.5.5.9”, httpPort)) {
Serial.println(“connection failed”);
return;
}
//Command for starting recording
String StartUrl = “/gp/gpControl/command/shutter?p=1”;
Serial.print(“Requesting URL: ”);
Serial.println(StartUrl);
client.print(String(“GET ”) + StartUrl + “ HTTP/1.1 ” +
“Host: ” + host + “ ” +
“Connection: close ”);
Serial.println(“Recording”);
}
void StopRecording(){
Serial.print(“connecting to ”);
Serial.println(host);
if (!client.connect(“10.5.5.9”, httpPort)) {
Serial.println(“connection failed”);
return;
}
//Command for stopping recording
String StopUrl = “/gp/gpControl/command/shutter?p=0”;
Serial.print(“Requesting URL: ”);
Serial.println(StopUrl);
client.print(String(“GET ”) + StopUrl + “ HTTP/1.1 ” +
“Host: ” + host + “ ” +
“Connection: close ”);
Serial.println(“Stopped”);
}
// FUNCTION TO WAKE UP THE CAMERA
void CameraInitiate(){
//Begin UDP communication
Udp.begin(localPort);
//Send the magic packet to wake up the GoPro out of sleep
delay(2000);
SendMagicPacket();
delay(5000);
// Absolutely necessary to flush port of UDP junk for Wifi client communication
Udp.flush();
delay(1000);
//Stop UDP communication
Udp.stop();
delay(1000);
}
// Function to create and send magic packet
// Taken and translated from here:
// https://www.logicaprogrammabile.it/wol-accendere-computer-arduino-wake-on-lan/
void SendMagicPacket(){
//Create a 102 byte array
byte magicPacket[102];
// Variables for cycling through the array
int Cycle = 0, CycleMacAdd = 0, IndexArray = 0;
// This for loop cycles through the array
for( Cycle = 0; Cycle 《 6; Cycle++){
// The first 6 bytes of the array are set to the value 0xFF
magicPacket[IndexArray] = 0xFF;
// Increment the array index
IndexArray++;
}
// Now we cycle through the array to add the GoPro address
for( Cycle = 0; Cycle 《 16; Cycle++ ){
//eseguo un Cycle per memorizzare i 6 byte del
//mac address
for( CycleMacAdd = 0; CycleMacAdd 《 6; CycleMacAdd++){
magicPacket[IndexArray] = remote_MAC_ADD[CycleMacAdd];
// Increment the array index
IndexArray++;
}
}
//The magic packet is now broadcast to the GoPro IP address and port
Udp.beginPacket(broadCastIp, wolPort);
Udp.write(magicPacket, sizeof magicPacket);
Udp.endPacket();
}
void printWifiStatus() {
// print the SSID of the network you’re attached to:
Serial.print(“SSID: ”);
Serial.println(WiFi.SSID());
// print your WiFi shield‘s IP address:
IPAddress ip = WiFi.localIP();
Serial.print(“IP Address: ”);
Serial.println(ip);
// print the received signal strength:
long rssi = WiFi.RSSI();
Serial.print(“signal strength (RSSI):”);
Serial.print(rssi);
Serial.println(“ dBm”);
}
步骤7:接收GoPro状态更新
可以使用此链接从GoPro接收状态更新:
http://10.5.5.9/gp/gpControl/status
当调用此链接时,它提供了一个JSON对象,可以使用此Camera Status指南进行解析。
最简单的方法是使用计算机连接到GoPro的wifi网络,并使用Web浏览器加载上述链接。
它将返回如下内容:
{“status”{“1”:1,“2”:2,“3”:0,“4”: 0, “6”:0, “8”:0, “9”:0, “10”:0, “13”:0, “14”:0, “15”:0, “16”:0, “17”:1, “19”:0, “20”:0, “21”:0, “22”:0, “23”:0, “24”:0, “26”:0,“27 “:0,” 28 “:82,” 29 “:” “ ”30“: ”“, ”31“:0, ”32“:0, ”33“:0, ”34“:2796,” 35 “:1917,” 36 “:0,” 37 “:1,” 38 “:0,” 39 “:1,” 40 “:” %12%05%13%0℃%04%0E”, “41” :0, “42”:0, “43”:0, “44”:0, “45”:0, “46”:1, “47”:1, “48”:1, “49”:0 , “54”:15476384, “55”:1, “56”:0, “57”:3927, “58”:0, “59”:0, “60”:500, “61”:2“, 62 “:0,” 63 “:0,” 64 “:0,” 69 “:1,” 71“ :12 , “72”:19, “73”:20, “74”:0}, “设置”:{ “1”:0, “2”:1, “3”:8 “4”:0” 5 “:0,” 6 “:1,” 7 “:1,” 8 “:1,” 9 “:0,” 10 “:0,” 11 “:0,” 12 “:0,” 13” :1, “14”:0, “15”:4, “16”:0, “17”:4 “18”:1, “19”:0, “20”:0, “21”:1 , “22”:0, “23”:0, “24”:0, “25”:0, “26”:4 “27”:0, “28”:4 “29”:5“, 30 “:0,” 31 “:0,” 32 “:3601,” 33 “:0,” 34 “:0,” 35 “:0,” 36 “:0,” 37 “:0,” 38“ :0, “39”:4 “40”:0, “41”:13, “42”:8, “43”:0, “44”:8, “45”:8中, “46”:0 , “47”:0, “48”:0, “52”:1, “54”:1, “57”:0, “58”:1, “59”:6中, “60”:8,” 61 “:1,” 62 “:2500000,” 63 “:7,” 64 “:4”,65 “:0,” 66 “:0,” 67 “:0,” 68 “:0,” 69” :1, “70”:0, “71”:0, “73”:0, “74”:0, “75”:3, “76”:3, “78”:1, “84”:0 , “85”:0, “86”:1, “87”:40 “89”:12, “91”:0, “92”:12, “95”:1, “96”:0}}
老实说,每次我试图用我的Arduino工作都会让我的GoPro崩溃。由于我没有真正需要这个功能用于我正在进行的大型项目,我在这部分停止了我的轮子。
但是,由于nes3dprinting,这里有一些代码可以用于ESP8266板:
// Code by https://www.instructables.com/member/nes3dprinting/
// This is for an ESP8266, not the MKR1000
// Made this for a GoPro Hero+. Should work for Hero4- Latest(Hero7)
//https://github.com/KonradIT/goprowifihack/blob/master/HERO/CameraStatus.md
#include ESP8266WiFi.h
// ArduinoJson Version 5.13
#include ArduinoJson.h
#include ESP8266HTTPClient.h
//########################## Enter GoPro WiFi Details Here #############################
const char* ssid = “GoProHero+”;
const char* pass = “GoProHero+”;
//######################################################################################
const char* host = “10.5.5.9”;
const int httpPort = 80;
void setup() {
Serial.begin(115200);
WiFi.mode(WIFI_STA);
WiFi.begin(ssid,pass);
}
void loop() {
if (WiFi.status() == WL_CONNECTED) {
// Prints the Current Mode of the Camera: Video-0, Photo-1, MultiShot-2
// https://github.com/KonradIT/goprowifihack/blob/master/HERO/CameraStatus.md
// Pick desired status from function below
GetStatus();
}
}
void GetStatus() {
//Serial.println(“Getting Status Updates”);
HTTPClient http; //Object of class HTTPClient
http.begin(“http://10.5.5.9/gp/gpControl/status”);
int httpCode = http.GET();
//Serial.print(“httpCode: ”);
//Serial.println(httpCode);
//Check the returning code
if (httpCode 》 0) {
// Parsing - Created Using ArduinoJson Assistant
// https://arduinojson.org/v5/assistant/
const size_t bufferSize = JSON_OBJECT_SIZE(2) + JSON_OBJECT_SIZE(55) + JSON_OBJECT_SIZE(64) + 730;
DynamicJsonBuffer jsonBuffer(bufferSize);
String str = http.getString();
//Serial.println(str);
JsonObject& root = jsonBuffer.parseObject(str);
JsonObject& status = root[“status”];
int status_1 = status[“1”]; // 1
int status_2 = status[“2”]; // 4
int status_3 = status[“3”]; // 0
int status_4 = status[“4”]; // 0
int status_6 = status[“6”]; // 0
int status_8 = status[“8”]; // 0
int status_9 = status[“9”]; // 0
int status_10 = status[“10”]; // 0
int status_11 = status[“11”]; // 0
int status_13 = status[“13”]; // 0
int status_14 = status[“14”]; // 0
int status_15 = status[“15”]; // 0
int status_16 = status[“16”]; // 0
int status_17 = status[“17”]; // 1
int status_19 = status[“19”]; // 0
int status_20 = status[“20”]; // 0
int status_21 = status[“21”]; // 0
int status_22 = status[“22”]; // 0
int status_23 = status[“23”]; // 0
int status_24 = status[“24”]; // 0
int status_26 = status[“26”]; // 0
int status_27 = status[“27”]; // 0
int status_28 = status[“28”]; // 0
const char* status_29 = status[“29”]; // “”
const char* status_30 = status[“30”]; // “GoProHero+”
int status_31 = status[“31”]; // 0
int status_32 = status[“32”]; // 0
int status_33 = status[“33”]; // 0
int status_34 = status[“34”]; // 4431
int status_35 = status[“35”]; // 4860
int status_36 = status[“36”]; // 0
int status_37 = status[“37”]; // 0
int status_38 = status[“38”]; // 0
int status_39 = status[“39”]; // 1
const char* status_40 = status[“40”]; // “%12%0B%0C%17%1E%08”
int status_41 = status[“41”]; // 0
int status_42 = status[“42”]; // 0
int status_43 = status[“43”]; // 1
int status_44 = status[“44”]; // 0
int status_45 = status[“45”]; // 0
int status_46 = status[“46”]; // 0
int status_47 = status[“47”]; // 0
int status_48 = status[“48”]; // 0
int status_49 = status[“49”]; // 0
long status_54 = status[“54”]; // 15899787264
int status_55 = status[“55”]; // 1
int status_56 = status[“56”]; // 4
int status_57 = status[“57”]; // 0
int status_58 = status[“58”]; // 0
int status_59 = status[“59”]; // 0
int status_60 = status[“60”]; // 500
int status_61 = status[“61”]; // 2
int status_62 = status[“62”]; // 0
int status_63 = status[“63”]; // 0
int status_64 = status[“64”]; // 2215
JsonObject& settings = root[“settings”];
int settings_1 = settings[“1”]; // 0
int settings_2 = settings[“2”]; // 11
int settings_3 = settings[“3”]; // 5
int settings_4 = settings[“4”]; // 0
int settings_5 = settings[“5”]; // 0
int settings_6 = settings[“6”]; // 1
int settings_7 = settings[“7”]; // 0
int settings_8 = settings[“8”]; // 0
int settings_9 = settings[“9”]; // 0
int settings_10 = settings[“10”]; // 0
int settings_11 = settings[“11”]; // 0
int settings_12 = settings[“12”]; // 0
int settings_13 = settings[“13”]; // 0
int settings_14 = settings[“14”]; // 4
int settings_15 = settings[“15”]; // 0
int settings_16 = settings[“16”]; // 0
int settings_17 = settings[“17”]; // 0
int settings_18 = settings[“18”]; // 0
int settings_19 = settings[“19”]; // 0
int settings_20 = settings[“20”]; // 0
int settings_21 = settings[“21”]; // 0
int settings_22 = settings[“22”]; // 0
int settings_23 = settings[“23”]; // 0
int settings_24 = settings[“24”]; // 0
int settings_25 = settings[“25”]; // 0
int settings_26 = settings[“26”]; // 0
int settings_27 = settings[“27”]; // 0
int settings_28 = settings[“28”]; // 0
int settings_29 = settings[“29”]; // 3
int settings_30 = settings[“30”]; // 0
int settings_31 = settings[“31”]; // 0
int settings_32 = settings[“32”]; // 10
int settings_33 = settings[“33”]; // 0
int settings_34 = settings[“34”]; // 0
int settings_35 = settings[“35”]; // 0
int settings_36 = settings[“36”]; // 0
int settings_37 = settings[“37”]; // 0
int settings_38 = settings[“38”]; // 0
int settings_39 = settings[“39”]; // 0
int settings_49 = settings[“49”]; // 100
int settings_50 = settings[“50”]; // 0
int settings_51 = settings[“51”]; // 2
int settings_52 = settings[“52”]; // 1
int settings_53 = settings[“53”]; // 1
int settings_54 = settings[“54”]; // 0
int settings_55 = settings[“55”]; // 3
int settings_56 = settings[“56”]; // 0
int settings_57 = settings[“57”]; // 0
int settings_58 = settings[“58”]; // 0
int settings_59 = settings[“59”]; // 0
int settings_60 = settings[“60”]; // 8
int settings_61 = settings[“61”]; // 1
long settings_62 = settings[“62”]; // 700000
int settings_63 = settings[“63”]; // 1
int settings_64 = settings[“64”]; // 2
int settings_68 = settings[“68”]; // 0
int settings_69 = settings[“69”]; // 0
int settings_70 = settings[“70”]; // 0
int settings_72 = settings[“72”]; // 0
int settings_73 = settings[“73”]; // 0
int settings_74 = settings[“74”]; // 0
int settings_75 = settings[“75”]; // 0
int settings_76 = settings[“76”]; // 0
int settings_77 = settings[“77”]; // 0
//########################### Set Desired State to Update Here ##########################################
Serial.print(“The Current State is: ”);
Serial.println(status_43);
//######################################################################################################
} else {
Serial.println(“No Response From Camera”);
}
}
-
Arduino
+关注
关注
184文章
6426浏览量
184792 -
Gopro
+关注
关注
0文章
74浏览量
28815
发布评论请先 登录
相关推荐
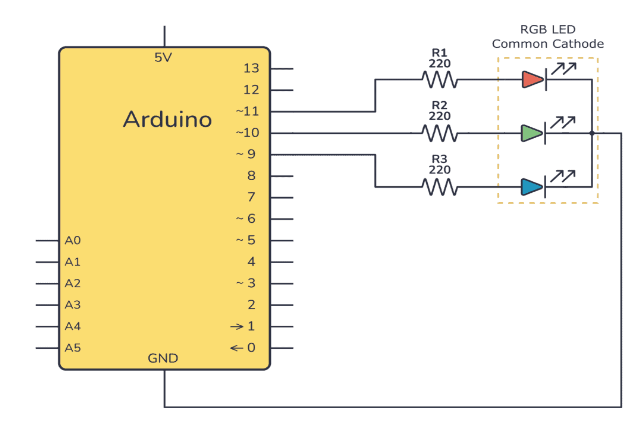
如何使用Arduino控制RGB LED
如何使用arduino板控制接触器?
如何使用Python和PinPong库控制Arduino

Arduino的PWM控制代码
GoPro Hero 5/6/7 Black Control带3DR Solo


 工商网监
工商网监
评论