 颜色分类机器人的制作
步骤1:硬件
这是我以前用来构建的这个。我使用来自phidgets.com的部件以及我躺在房子周围的东西100%构建它。
Phidgets Boards,Motors,Hardware
HUB0000 - VINT Hub Phidget
1108 - 磁传感器
2x STC1001 - 2.5A Stepper Phidget
2x 3324 - 42STH38 NEMA-17双极无齿轮步进器
3x 3002 - Phidget电缆60厘米
3031 - 母尾5.5x2.1mm
3029 - 2线100‘绞线
3604 - 10mm白色LED(10个袋子)
3402 - USB网络摄像头
其他部件
车库废木和金属
拉链
底部切断的塑料容器
第2步:设计机器人
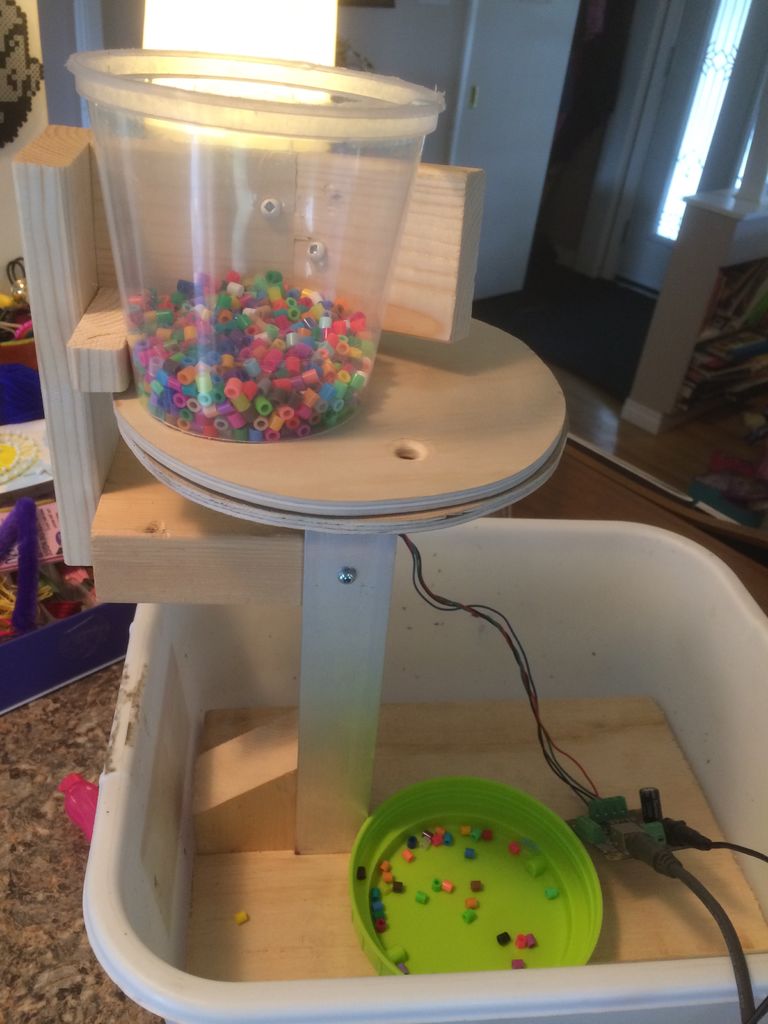


我们需要设计一些可以从输入料斗中取出一个珠子,将其放在网络摄像头下,然后将其移动到适当的箱子中的东西。
珠子皮卡
我决定用2片圆形胶合板做第1部分,每个胶合板在同一个地方钻一个洞。底部件固定,顶部件连接到步进电机,步进电机可以在装有珠子的料斗下方旋转。当孔在料斗下移动时,它会拾取一个珠子。然后我可以在网络摄像头下旋转它,然后进一步旋转,直到它与底部的孔匹配,此时它就会落下。
在这张图片中,我正在测试系统能行得通。一切都是固定的,除了顶部的圆形胶合板,它与下面的步进电机相连。网络摄像头尚未安装。我现在只是使用Phidget控制面板转向电机。
珠子存储
下一部分是设计用于保持每种颜色的bin系统。我决定使用下面的第二个步进电机来支撑和旋转具有均匀间隔隔间的圆形容器。这可以用来旋转珠子将从其中掉出的孔下方的正确隔间。
我使用纸板和胶带来构建它。这里最重要的是一致性 - 每个隔间应该是相同的尺寸,整个东西应该均匀加重,以便旋转而不会跳过。
通过紧密贴合的盖子完成珠子的移除一次只有一个隔间,所以可以倒出珠子。
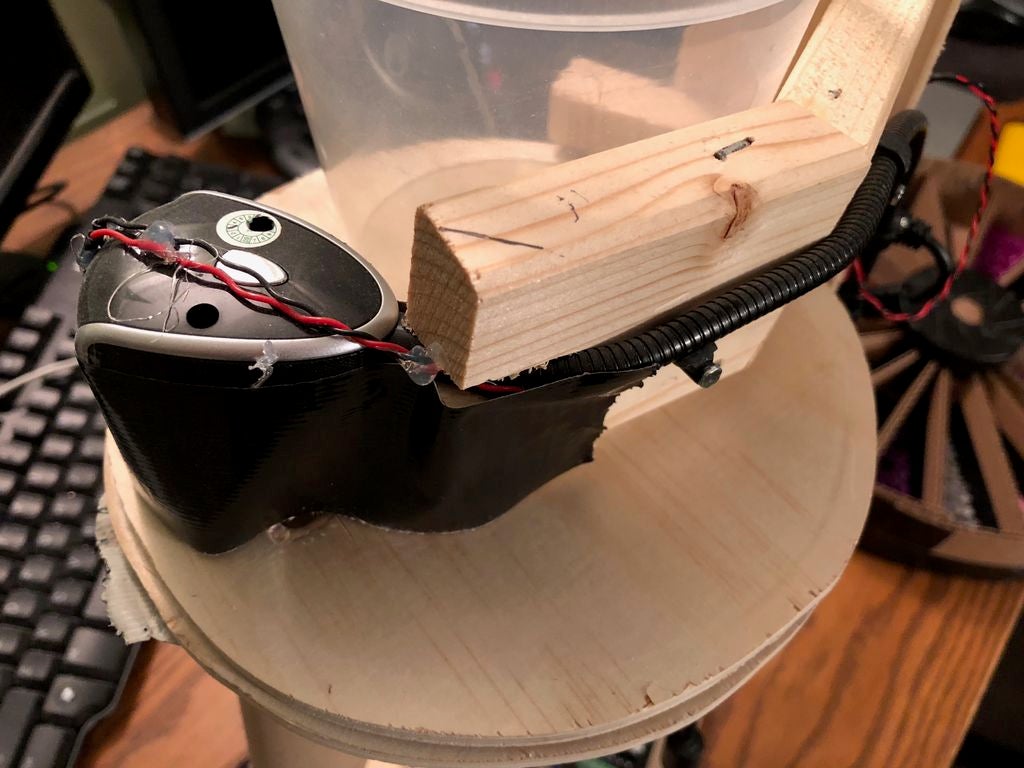
摄像头
网络摄像头安装在料斗和下板孔位置之间的顶板上。这允许系统在掉落之前观察珠子。 LED用于照亮相机下方的珠子,并且环境光被阻挡,以提供一致的照明环境。这对于准确的颜色检测非常重要,因为环境光可以真正地消除感知颜色。
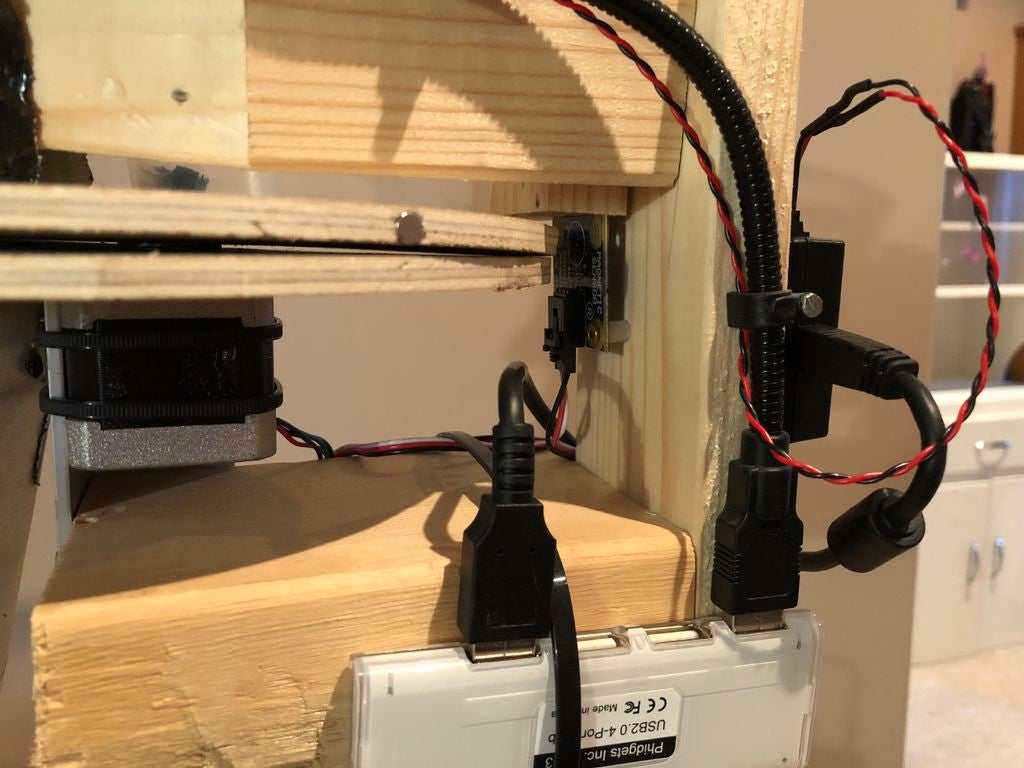
位置检测
系统能够检测到珠子的旋转非常重要分隔器。这用于在启动时设置初始位置,但也用于检测步进电机是否已经不同步。在我的系统中,一个珠子有时会在拾取时卡住,系统需要能够检测并处理这种情况 - 通过备份和尝试agian。
有很多方法可以处理这个(事情。我决定使用1108磁传感器,在顶板的边缘嵌入磁铁。这允许我验证每次旋转的位置。一个更好的解决方案可能是步进电机上的编码器,但我有一个1108左右,所以我使用它。
完成机器人
此时,一切都已经完成出来,并测试。现在是时候安装好所有东西并转向编写软件。
2个步进电机由STC1001步进控制器驱动。 HUB000-USB VINT集线器用于运行步进控制器,以及读取磁传感器和驱动LED。网络摄像头和HUB0000都连接到一个小型USB集线器。使用3031引线和一些电线以及24V电源为电机供电。
步骤3:编写代码
C#和Visual Studio 2015用于此项目。下载本页顶部的源代码并按照步骤进行操作 - 主要部分概述如下
初始化
首先,我们必须创建,打开和初始化Phidget对象。这是在表单加载事件和Phidget附加处理程序中完成的。
private void Form1_Load(object sender, EventArgs e) {
/* Initialize and open Phidgets */
top.HubPort = 0;
top.Attach += Top_Attach;
top.Detach += Top_Detach;
top.PositionChange += Top_PositionChange;
top.Open();
bottom.HubPort = 1;
bottom.Attach += Bottom_Attach;
bottom.Detach += Bottom_Detach;
bottom.PositionChange += Bottom_PositionChange;
bottom.Open();
magSensor.HubPort = 2;
magSensor.IsHubPortDevice = true;
magSensor.Attach += MagSensor_Attach;
magSensor.Detach += MagSensor_Detach;
magSensor.SensorChange += MagSensor_SensorChange;
magSensor.Open();
led.HubPort = 5;
led.IsHubPortDevice = true;
led.Channel = 0;
led.Attach += Led_Attach;
led.Detach += Led_Detach;
led.Open();
}
private void Led_Attach(object sender, Phidget22.Events.AttachEventArgs e) {
ledAttachedChk.Checked = true;
led.State = true;
ledChk.Checked = true;
}
private void MagSensor_Attach(object sender, Phidget22.Events.AttachEventArgs e) {
magSensorAttachedChk.Checked = true;
magSensor.SensorType = VoltageRatioSensorType.PN_1108;
}
private void Bottom_Attach(object sender, Phidget22.Events.AttachEventArgs e) {
bottomAttachedChk.Checked = true;
bottom.CurrentLimit = bottomCurrentLimit;
bottom.Engaged = true;
bottom.VelocityLimit = bottomVelocityLimit;
bottom.Acceleration = bottomAccel;
bottom.DataInterval = 100;
}
private void Top_Attach(object sender, Phidget22.Events.AttachEventArgs e) {
topAttachedChk.Checked = true;
top.CurrentLimit = topCurrentLimit;
top.Engaged = true;
top.RescaleFactor = -1;
top.VelocityLimit = -topVelocityLimit;
top.Acceleration = -topAccel;
top.DataInterval = 100;
}
我们还在初始化期间读取任何已保存的颜色信息,因此可以继续之前的运行。
电机定位
电机处理代码包括用于移动电机的便利功能。我使用的电机每转3,200 1/16步,所以我为此创建了一个常量。
对于顶部电机,我们希望能够将3个位置发送到电机:网络摄像头,孔和定位磁铁。有一个功能可以到达每个位置:
private void nextMagnet(Boolean wait = false) {
double posn = top.Position % stepsPerRev;
top.TargetPosition += (stepsPerRev - posn);
if (wait)
while (top.IsMoving)
Thread.Sleep(50);
}
private void nextCamera(Boolean wait = false) {
double posn = top.Position % stepsPerRev;
if (posn 《 Properties.Settings.Default.cameraOffset)
top.TargetPosition += (Properties.Settings.Default.cameraOffset - posn);
else
top.TargetPosition += ((Properties.Settings.Default.cameraOffset - posn) + stepsPerRev);
if (wait)
while (top.IsMoving)
Thread.Sleep(50);
}
private void nextHole(Boolean wait = false) {
double posn = top.Position % stepsPerRev;
if (posn 《 Properties.Settings.Default.holeOffset)
top.TargetPosition += (Properties.Settings.Default.holeOffset - posn);
else
top.TargetPosition += ((Properties.Settings.Default.holeOffset - posn) + stepsPerRev);
if (wait)
while (top.IsMoving)
Thread.Sleep(50);
}
在开始运行之前,使用磁传感器对齐顶板。可以随时调用alignMotor函数来对齐顶板。该功能首先快速将板转动至1转,直至其磁铁数据高于阈值。然后它稍微后退一点并慢慢向前移动,捕捉传感器数据。最后,它将位置设置为最大磁铁数据位置,并将位置偏移重置为0.因此,最大磁铁位置应始终为(top.Position%stepsPerRev)
Thread alignMotorThread;
Boolean sawMagnet;
double magSensorMax = 0;
private void alignMotor() {
//Find the magnet
top.DataInterval = top.MinDataInterval;
sawMagnet = false;
magSensor.SensorChange += magSensorStopMotor;
top.VelocityLimit = -1000;
int tryCount = 0;
tryagain:
top.TargetPosition += stepsPerRev;
while (top.IsMoving && !sawMagnet)
Thread.Sleep(25);
if (!sawMagnet) {
if (tryCount 》 3) {
Console.WriteLine(“Align failed”);
top.Engaged = false;
bottom.Engaged = false;
runtest = false;
return;
}
tryCount++;
Console.WriteLine(“Are we stuck? Trying a backup.。.”);
top.TargetPosition -= 600;
while (top.IsMoving)
Thread.Sleep(100);
goto tryagain;
}
top.VelocityLimit = -100;
magData = new List》();
magSensor.SensorChange += magSensorCollectPositionData;
top.TargetPosition += 300;
while (top.IsMoving)
Thread.Sleep(100);
magSensor.SensorChange -= magSensorCollectPositionData;
top.VelocityLimit = -topVelocityLimit;
KeyValuePair max = magData[0];
foreach (KeyValuePair pair in magData)
if (pair.Value 》 max.Value)
max = pair;
top.AddPositionOffset(-max.Key);
magSensorMax = max.Value;
top.TargetPosition = 0;
while (top.IsMoving)
Thread.Sleep(100);
Console.WriteLine(“Align succeeded”);
}
List》 magData;
private void magSensorCollectPositionData(object sender, Phidget22.Events.VoltageRatioInputSensorChangeEventArgs e) {
magData.Add(new KeyValuePair(top.Position, e.SensorValue));
}
private void magSensorStopMotor(object sender, Phidget22.Events.VoltageRatioInputSensorChangeEventArgs e) {
if (top.IsMoving && e.SensorValue 》 5) {
top.TargetPosition = top.Position - 300;
magSensor.SensorChange -= magSensorStopMotor;
sawMagnet = true;
}
}
最后,通过将底部马达发送到其中一个胎圈容器位置来控制底部马达。对于这个项目,我们有19个职位。算法选择最短路径,顺时针或逆时针转动。
private int BottomPosition {
get {
int posn = (int)bottom.Position % stepsPerRev;
if (posn 《 0)
posn += stepsPerRev;
return (int)Math.Round(((posn * beadCompartments) / (double)stepsPerRev));
}
}
private void SetBottomPosition(int posn, bool wait = false) {
posn = posn % beadCompartments;
double targetPosn = (posn * stepsPerRev) / beadCompartments;
double currentPosn = bottom.Position % stepsPerRev;
double posnDiff = targetPosn - currentPosn;
// Keep it as full steps
posnDiff = ((int)(posnDiff / 16)) * 16;
if (posnDiff 《= 1600)
bottom.TargetPosition += posnDiff;
else
bottom.TargetPosition -= (stepsPerRev - posnDiff);
if (wait)
while (bottom.IsMoving)
Thread.Sleep(50);
}
摄像机
OpenCV用于从网络摄像头读取图像。在启动主排序线程之前启动相机线程。该线程不断读入图像,使用Mean计算特定区域的平均颜色并更新全局颜色变量。该线程还使用HoughCircles来检测珠子或顶板上的孔,以细化它正在寻找颜色检测的区域。阈值和HoughCircles数字是通过反复试验确定的,并且在很大程度上取决于网络摄像头,光照和间距。
bool runVideo = true;
bool videoRunning = false;
VideoCapture capture;
Thread cvThread;
Color detectedColor;
Boolean detecting = false;
int detectCnt = 0;
private void cvThreadFunction() {
videoRunning = false;
capture = new VideoCapture(selectedCamera);
using (Window window = new Window(“capture”)) {
Mat image = new Mat();
Mat image2 = new Mat();
while (runVideo) {
capture.Read(image);
if (image.Empty())
break;
if (detecting)
detectCnt++;
else
detectCnt = 0;
if (detecting || circleDetectChecked || showDetectionImgChecked) {
Cv2.CvtColor(image, image2, ColorConversionCodes.BGR2GRAY);
Mat thres = image2.Threshold((double)Properties.Settings.Default.videoThresh, 255, ThresholdTypes.Binary);
thres = thres.GaussianBlur(new OpenCvSharp.Size(9, 9), 10);
if (showDetectionImgChecked)
image = thres;
if (detecting || circleDetectChecked) {
CircleSegment[] bead = thres.HoughCircles(HoughMethods.Gradient, 2, /*thres.Rows/4*/ 20, 200, 100, 20, 65);
if (bead.Length 》= 1) {
image.Circle(bead[0].Center, 3, new Scalar(0, 100, 0), -1);
image.Circle(bead[0].Center, (int)bead[0].Radius, new Scalar(0, 0, 255), 3);
if (bead[0].Radius 》= 55) {
Properties.Settings.Default.x = (decimal)bead[0].Center.X + (decimal)(bead[0].Radius / 2);
Properties.Settings.Default.y = (decimal)bead[0].Center.Y - (decimal)(bead[0].Radius / 2);
} else {
Properties.Settings.Default.x = (decimal)bead[0].Center.X + (decimal)(bead[0].Radius);
Properties.Settings.Default.y = (decimal)bead[0].Center.Y - (decimal)(bead[0].Radius);
}
Properties.Settings.Default.size = 15;
Properties.Settings.Default.height = 15;
} else {
CircleSegment[] circles = thres.HoughCircles(HoughMethods.Gradient, 2, /*thres.Rows/4*/ 5, 200, 100, 60, 180);
if (circles.Length 》 1) {
List xs = circles.Select(c =》 c.Center.X).ToList();
xs.Sort();
List ys = circles.Select(c =》 c.Center.Y).ToList();
ys.Sort();
int medianX = (int)xs[xs.Count / 2];
int medianY = (int)ys[ys.Count / 2];
if (medianX 》 image.Width - 15)
medianX = image.Width - 15;
if (medianY 》 image.Height - 15)
medianY = image.Height - 15;
image.Circle(medianX, medianY, 100, new Scalar(0, 0, 150), 3);
if (detecting) {
Properties.Settings.Default.x = medianX - 7;
Properties.Settings.Default.y = medianY - 7;
Properties.Settings.Default.size = 15;
Properties.Settings.Default.height = 15;
}
}
}
}
}
Rect r = new Rect((int)Properties.Settings.Default.x,
(int)Properties.Settings.Default.y,
(int)Properties.Settings.Default.size,
(int)Properties.Settings.Default.height);
Mat beadSample = new Mat(image, r);
Scalar avgColor = Cv2.Mean(beadSample);
detectedColor = Color.FromArgb((int)avgColor[2], (int)avgColor[1], (int)avgColor[0]);
image.Rectangle(r, new Scalar(0, 150, 0));
window.ShowImage(image);
Cv2.WaitKey(1);
videoRunning = true;
}
videoRunning = false;
}
}
private void cameraStartBtn_Click(object sender, EventArgs e) {
if (cameraStartBtn.Text == “start”) {
cvThread = new Thread(new ThreadStart(cvThreadFunction));
runVideo = true;
cvThread.Start();
cameraStartBtn.Text = “stop”;
while (!videoRunning)
Thread.Sleep(100);
updateColorTimer.Start();
} else {
runVideo = false;
cvThread.Join();
cameraStartBtn.Text = “start”;
}
}
颜色
现在,我们可以确定珠子的颜色,并根据该颜色决定将其放入哪个容器。
这个步骤依赖于颜色比较。我们希望能够区分颜色以限制误报,但也允许足够的阈值来限制假阴性。比较颜色实际上是非常复杂的,因为计算机将颜色存储为RGB的方式,以及人类感知颜色的方式并不是线性相关的。更糟糕的是,还必须考虑在下面观察颜色的光的颜色。
有复杂的计算色差的算法。我们使用CIE2000,如果2种颜色与人类无法区分,则输出接近1的数字。我们使用ColorMine C#库来完成这些复杂的计算。已发现DeltaE值为5可在假阳性和假阴性之间提供良好的折衷。
由于容器通常有更多颜色,因此最后一个位置保留为捕获箱。我通常将这些设置为第二次通过机器。
List
colors = new List
();
List
colorPanels = new List
();
List colorsTxts = new List();
List colorCnts = new List();
const int numColorSpots = 18;
const int unknownColorIndex = 18;
int findColorPosition(Color c) {
Console.WriteLine(“Finding color.。.”);
var cRGB = new Rgb();
cRGB.R = c.R;
cRGB.G = c.G;
cRGB.B = c.B;
int bestMatch = -1;
double matchDelta = 100;
for (int i = 0; i 《 colors.Count; i++) {
var RGB = new Rgb();
RGB.R = colors[i].R;
RGB.G = colors[i].G;
RGB.B = colors[i].B;
double delta = cRGB.Compare(RGB, new CieDe2000Comparison());
//double delta = deltaE(c, colors[i]);
Console.WriteLine(“DeltaE (” + i.ToString() + “): ” + delta.ToString());
if (delta 《 matchDelta) {
matchDelta = delta;
bestMatch = i;
}
}
if (matchDelta 《 5) {
Console.WriteLine(“Found! (Posn: ” + bestMatch + “ Delta: ” + matchDelta + “)”);
return bestMatch;
}
if (colors.Count 《 numColorSpots) {
Console.WriteLine(“New Color!”);
colors.Add(c);
this.BeginInvoke(new Action(setBackColor), new object[] { colors.Count - 1 });
writeOutColors();
return (colors.Count - 1);
} else {
Console.WriteLine(“Unknown Color!”);
return unknownColorIndex;
}
}
排序逻辑
排序功能将所有部分汇集在一起以实际排序珠子。该函数在专用线程中运行;移动顶板,检测珠子颜色,将其放入垃圾箱,确保顶板保持对齐,计数珠子等。当垃圾箱变满时,它也会停止运行 - 否则我们最终会溢出珠子。
Thread colourTestThread;
Boolean runtest = false;
void colourTest() {
if (!top.Engaged)
top.Engaged = true;
if (!bottom.Engaged)
bottom.Engaged = true;
while (runtest) {
nextMagnet(true);
Thread.Sleep(100);
try {
if (magSensor.SensorValue 《 (magSensorMax - 4))
alignMotor();
} catch { alignMotor(); }
nextCamera(true);
detecting = true;
while (detectCnt 《 5)
Thread.Sleep(25);
Console.WriteLine(“Detect Count: ” + detectCnt);
detecting = false;
Color c = detectedColor;
this.BeginInvoke(new Action
(setColorDet), new object[] { c });
int i = findColorPosition(c);
SetBottomPosition(i, true);
nextHole(true);
colorCnts[i]++;
this.BeginInvoke(new Action(setColorTxt), new object[] { i });
Thread.Sleep(250);
if (colorCnts[unknownColorIndex] 》 500) {
top.Engaged = false;
bottom.Engaged = false;
runtest = false;
this.BeginInvoke(new Action(setGoGreen), null);
return;
}
}
}
private void colourTestBtn_Click(object sender, EventArgs e) {
if (colourTestThread == null || !colourTestThread.IsAlive) {
colourTestThread = new Thread(new ThreadStart(colourTest));
runtest = true;
colourTestThread.Start();
colourTestBtn.Text = “STOP”;
colourTestBtn.BackColor = Color.Red;
} else {
runtest = false;
colourTestBtn.Text = “GO”;
colourTestBtn.BackColor = Color.Green;
}
}
此时,我们有一个工作程序。一些代码被遗漏在文章之外,所以看一下实际运行它的源代码。
-
机器人
+关注
关注
206文章
26978浏览量
201309
发布评论请先 登录
相关推荐
【开源作品】基于树莓派4B、ESP32制作的桌面机器人、气象站、立方光!
LabVIEW的六轴工业机器人运动控制系统
ROS让机器人开发更便捷,基于RK3568J+Debian系统发布!
使用Arduino和PAJ7620手势传感器制作手势控制机器人
【开源资料】使用ESP32C3超简单制作迷你四足机器人
ai人工智能机器人
基于Matlab和VR技术的移动机器人建模及仿真
爬壁机器人的分类有哪些 爬壁机器人和其他机器区别在哪


 工商网监
工商网监
评论